Learn how to make Chive Blossom Vinegar and see how easy it truly is to create this beautiful and flavorful vinegar that’s delicious on potatoes, salad and so much more!

The first year we had chive blossoms on our chive plants I was overjoyed. These plants had been planted the previous season (in 2020) and over-wintered in the garden – dying back in the late fall when the weather turned cold and then popping up first thing in the spring with fresh, green shoots.
What is a Chive Blossom?
When they reached about 12-inches tall, a beautiful purple-pink blossom formed on the ends of many of the chive stalks. These are called chive blossoms and when they’re allowed to mature and dry out, they will produce seeds for the next year’s chive crop. But when you cut the beautiful chive flowers off, not only can you use them in floral arrangements, but you can also eat them. Chive blossoms taste exactly like the chive plants’ green stalks. They can be used in so many different ways like on this Chive Blossom Chicken or to make Chive Blossom Vinegar.
When our chive plants popped, I decided to learn how to make how to make Chive Blossom Vinegar and was amazed at how easy the process truly was.

How to make Chive Blossom Vinegar
First of all, when you learn how to make Chive Blossom Vinegar, you need to start with the chive blossoms. If you don’t have any, you can’t make this recipe. 🙁 The good news is that chives are one of the easiest plants to grow! Not only that but I find that they resemble ornamental grasses and can look good as part of everyday perennial landscaping. In fact, next year I have a plan to grow them all along one side of the chicken fence.
Aside from the chive blossoms themselves, the only other ingredient you need for learning how to make Chive Blossom Vinegar is vinegar! For this you can use any kind of vinegar you like. I prefer to use plain ol’ vinegar because its the most economical when you’re making 16 ounces of this. However, you can use anything you like from apple cider vinegar, which should produce a lovely taste, to champagne vinegar

Steps for making Chive Blossom Vinegar
If you have the chive blossoms and you have the vinegar, you’re all set! You can begin making this beautiful, homemade vinegar.
First, make sure to pick the freshest flowers for your vinegar. (See the photo above? Old blooms are on the left and the newest blooms are on the right.) If they seem to be drying out or they seem to be changing color just a tad (the first thing they do before they start to dry), don’t use them. Use the best blossoms only. After all, you’re eating this.
Next, clean the chive blossoms really well. Run them under water and then let them dry on a paper towel or hand towel. Every now and then you might find a few bugs on the blooms and you don’t want those in the homemade vinegar.
From this point, there are two ways to go about making Chive Blossom Vinegar that will work – the slow way and the fast way. The benefit to the slow way is that it produces better flavor if you can wait. With the fast way, well it’s faster but the flavor won’t be as intense. Personally, I think the slow way is worth the wait.

The slow way
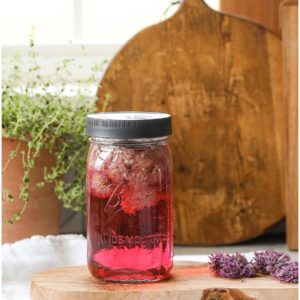
When the blooms are dry, combine them with the vinegar in a large, 16 oz. mason jar {HERE}. Make sure the blossoms are completely submerged and cover the jar tightly.
I’ve found that some people suggest covering the jar with cheesecloth. This looks pretty, but in reality I think it is more sanitary to completely close the jar. Those little kitchen fruit flies are attracted to vinegar. The metal lids are also not the best for vinegar as it can corrode them. I personally feel better when sealing the jar with these reusable Ball lids {HERE} for regular jar openings. Wide mouth lids are {HERE}.
Then let the jar sit for two weeks at room temperature and away from direct light and heat. Then watch the blossoms infuse the vinegar with their beautiful color and flavor.


The fast way
For how to make chive blossom vinegar the fast way, follow the same cleaning steps but then heat the vinegar. Pour the heated vinegar over the blooms in the mason jar. Then seal the jar and again keep it at room temperature and away from direct light and heat. This time you only need to wait three days.

The final step
No matter which way you go, once the time is up, use a strainer with a funnel to strain the flowers from the liquid. I use this one {HERE}. Then add the vinegar to a storage container. I like these oil and vinegar cruets {HERE} because they have a closure at the top. Again, if you leave the vinegar open, you’re going to find a few fruit flies have sampled it before you can.


Once everything has been strained you can use the vinegar right away! I suggest using it on French Fries, salads and even sub sandwiches!
You can see my one jar gave me one and a half cruets of Chive Blossom Vinegar. Store this in the same place you store other vinegars. Do not refrigerate.
Looking for more garden fresh recipes?
Try these recipes too if you love making food with things straight from the garden.
- Garlic Scape Pesto {HERE}
- Garden Herb Cream Cheese Spread {HERE}
- Asparagus and Pea Salad with Mint {HERE}
- French Potato Salad {HERE}
- Blackberry Sage Water {HERE}
Thank you so much for following along today, friends! The full printable recipe for how to make Chive Blossom Vinegar is below. If you try it please come back and let me know!
How to make Chive Blossom Vinegar
Equipment
- 1 16 oz. canning jar
- 1 canning jar lid
- 1 Strainer
- 2 oil and vinegar cruets
Ingredients
- 3 cups chive blossoms
- 16 oz. of white vinegar Or vinegar of your choice.
Instructions
- Pick the chive blossoms and then rinse them and dry them completely.
The Slow Method
- Add the chive blossoms to a mason jar and completely submerge with vinegar.
- Seal well then set aside for two weeks at room temperature. Out of the direct light and heat.
- When time is up, strain the flowers and discard. Use the vinegar as you would any vinegar!
The fast way
- Heat the vinegar, but don't boil it.
- Pour hot vinegar over the chive blossoms in the mason jar.
- Seal well and then set aside for three days.
- When time is up, strain the flowers and discard. Use the vinegar as you would any vinegar!


Leave a Reply