Thank you so much for visiting! This post contains affiliate links. That means I may receive a small amount of compensation if you choose to purchase from my links. I only link to products that I know and love.
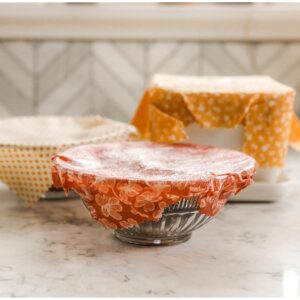
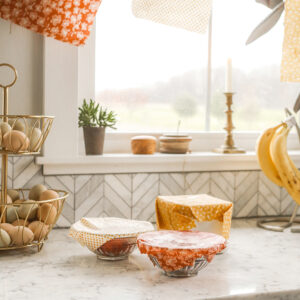
Make these Earth friendly DIY beeswax wraps and use them again and again. Easy to make and easy to use.

When we moved here, I knew I wanted to try to live more sustainably. At times it’s been a slow journey because life has made us very dependent on plastic, gasoline and more. We are not perfect in this space, but I’m a firm believer in baby steps. Last week I took another one towards doing away with one-time plastic wrap and made DIY beeswax wraps.
I’ve been wanting to make some DIY beeswax wraps forever and to celebrate Earth Day last week, I finally made a handful of these pretty patterned wraps.

Supplies you need for beeswax wraps
To make the beeswax wraps that I made, you’ll need a few things. You can buy them individually or you can find them all on my Amazon storefront list {HERE}
- Beeswax – You can buy this in pellet form like I did {HERE}. They come in white or the yellow beeswax color. Or you can buy this as a block {HERE} and grate it.
- Jojoba – You can find this {HERE}. This makes the wraps more pliable.
- Pine resin – This is food safe and this is what makes the wraps sticky. {HERE}
- A large brush to paint with
- A double boiler or a melting pot that used for crafts. This {HERE} is the one I use.
- A baking sheet
- Parchment paper
- A drying space – I made this with two nails in my wall and a piece of twine
- Clothes pins
- Fabric for the wraps
- Pinking sheers – These will be best so the fabric doesn’t fray
Now, I realize there are a lot of other DIY beeswax recipes out there that may or may not include things ingredients. I’ll go into the things you can substitute or eliminate below.

How to make DIY beeswax wraps
To make the wraps, you first need to cut them to size. Some people will measure them out and cut them, but I didn’t see the need to measure each food storage container. I just cut various squares and rectangles that I knew would fit over bowls and multiple plastic use containers that are missing lids.
Using the pinking sheets here is important thought because they keep the edges of the material from fraying.
Next line a baking sheet with parchment paper and melt the ingredients together. The pine resin will take a long time to melt. Make sure to use the crushed pieces as they will melt better and they will more easily mix with the other ingredients.
Then place your fabric in the parchment paper and paint in with the mixture. Bake it in the oven for 2 minutes.
Lastly, flip the DIY beeswax wrap fabric over and paint the other side. Hang it to dry. If you want to see a video of the whole process, you can watch my Instagram reel {HERE}. I’ve messed with the recipe a bit since making these so go with the recipe here versus what you see in the IG video. Hopefully I’ll make a YouTube one soon.

Things I learned making DIY beeswax wraps
In making these, I learned a couple of lessons that I’ll apply to making more wraps.
- The pine resin is what makes the wraps sticky and allows them to stick to themselves and the bowls. You can see my wraps glisten and this is from the resin. You can make them without the resin and I’ll go into that below.
- The resin takes awhile to melt. Try to use the small pieces or even the crushed dust as opposed to the larger pieces.
- The pine resin might still clump as you add it to the wrap. To help with this, I suggest using fabric that’s more colorful verses white.
- Make sure that whatever you’re using to melt the ingredients is something that can be used just for crafts. You can put them in a mason jar and have that act as the double boiler if you don’t want to use a melter similar to mine. Although, it has come in handy making homemade soap and beeswax lotion bars.
- You can find jojoba oil at the craft store if you don’t want to order it online. Hobby Lobby generally has some in stock.
Can I make DIY beeswax wraps without pine resin?
The short answer to this question is yes. You can make DIY beeswax wraps without pine resin. They won’t be as sticky as the wraps with the pine resin, but they will be decent enough.

Other ingredient substitutes and ways to make beeswax wraps
I’ve heard that you can also make DIY beeswax wraps without the jojoba oil. Instead people will replace it with coconut oil or olive oil. I haven’t tested this but I’m excited to try. I keep both those on hand on a regular basis and tend to use them when making things like my peppermint foot scrub {HERE} or body scrub {HERE}.
Also, you may have seen an iron on technique or a “sprinkle pellets” directly on fabric technique. I prefer using this way of brushing the mix on because I can make sure the fabric is fully covered. I also do paint both sides even though the wax will soak through. It’s food and I believe in making it as safe as possible.
How to clean beeswax wraps
To clean DIY beeswax wraps all you need to do it wash them under cool water with a little soap. Any dishwashing soap will do but I always prefer a more natural alternative.

How long do beeswax wrap last?
DIY beeswax wraps will last you for several months and then they may need to be refreshed with a coat of wax. Most people can use the same one for a year or even two without needing to compost them. And yes, they can be composted too when they’ve reached their end of life.
Thank you so much for joining me today friends! I hope you love this DIY beeswax wrap tutorial. All supplies and instructions are included in a printable form below.
If you’re looking for more natural products to DIY for your home, check out these lotion bars {HERE}, this Goat’s milk soap that you can make without a goat {HERE} and this homemade milk bath {HERE}.

DIY Beeswax wraps recipe
Make this easy DIY beeswax recipe and use these wraps again and again as a sustainable solution to plastic wrap.
Print
Pin
Rate
Equipment
- Melting pot or a double boiler
Ingredients
- 1/2 cup beeswax pellets or grated
- 3 Tbsp. food safe pine resin
- 1 Tbsp. jojoba oil
- Pinking sheers
- Disposable, large paint brush
- Melting pot or double boiler
- Parchment paper
- Baking sheet
- Clothes pins
- Somewhere to hang to dry. These will not drip so they don't have to be outside.
- Fabric for the wraps, cut to various sizes
Instructions
- Combine beeswax, food safe pine resin and jojoba oil and melt. Use a double boiler, a chocolate melter that you use for crafts or boil water and add a mason jar to it.
- While everything melts, cut the fabric to the desired size.
- Add parchment paper to a baking sheet and preheat the oven to 300 degrees.
- Once the wax mix has melted, place the fabric on the parchment paper and paint with the wax mix.
- Add this to the oven for 2 minutes.
- Flip the fabric over and paint the other side.
- Hang to dry overnight and then you can use immediately.


How do you store them?
You can store them rolled up in a drawer or a basket. Mine are currently in a drawer with the plastics that we still sometimes use. You can see a photo of them if you search the kitchen organization post
Love this tutorial! Can’t wait to try! Do you not need to place back in the oven after you flip it and add wax to the other side?
I have the same question.
No you do not. You can. It will help them dry a little faster. It helps the wax to melt more evenly too. But it is not required.
No you do not. You can. It will help them dry a little faster. It helps the wax to melt more evenly too. But it is not required.