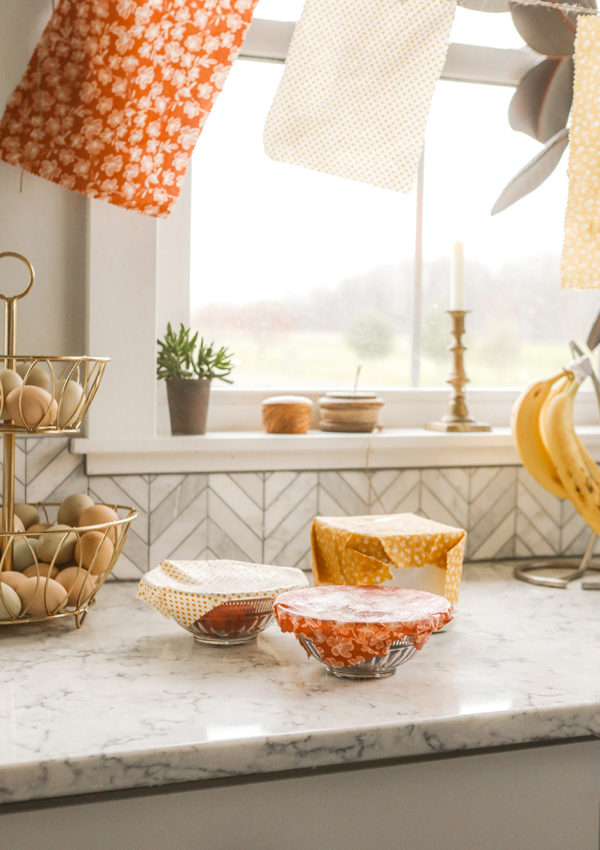
This DIY Trinket Dish or DIY ring dish is a cute, clay craft to make if you’re feeling the need to create something and it can also be a great gift too. Save it in case you need it later!

I started working with clay in 2022 and have loved it ever since. Kevin bought me a gift card to a pottery studio here for my birthday and prior to signing up for classes, I thought I would try working with some air dry clay and oven bake clay to make little trinket dishes and other small items.
I began making a DIY trinket dish that summer in the shape of a sunflower and a maple leaf from our tree outside. However, once I started working with greenware pottery that’s kiln fired, I filled my time with it and stopped working with clay I could use at home. That said, I wanted to show you all how you could create little a DIY trinket dish or a DIY ring dish as a fun, afternoon project using air dry clay and oven baked clay.
What’s the difference between air dry clay and oven baked clay?
The difference between air dry clay and oven baked clay is exactly as it sounds. One hardens via the air and the other one needs to be baked in the oven at a low temperature. When it comes to the clay itself, I generally prefer oven baked. However, I’ve made a DIY trinket dish with each type and have been perfectly fine.
For the air dry clay, I’ve used Crayola and DAS. You can find the air dry clay at any craft store. Or you can find DAS clay {HERE} and Crayola clay {HERE}. For the oven baked clay I prefer Sculpey {HERE}.
IMPORTANT: Please keep in mind that neither air dry clay nor oven baked clay are food safe clays and should not be used to make dishes or anything you out food items in. They’re best used for items like a DIY trinket dish, earrings, necklaces, small planters, necklaces, barrettes, pins, wall art, ornaments, paper weights, coasters, candle holders, gift tags and my favorite – garden markers! You can see some garden markers I made {HERE} for our garden.


Supplies for the DIY trinket dish
So, in order to make the trinket dish or the DIY ring dish there’s a few things you need.
- Clay – Decide whether you want to use air dry clay or oven baked clay. I have to say, I have more experience with oven baked, but I’m told people like air dry just as much. When I was working with this to make one of each I thought that the air dry clay had too may air bubbles for my liking. The oven baked clay will be harder and you will need to wedge it some or work it with your hands in order to manipulate it more.
- Cookie Cutters – I used these {HERE} to cut my circles. However, you don’t necessarily need these because you could also make a more abstract design too. I’m a fan of symmetry though.
- Parchment paper or wax paper – This is for your workspace. You want to put it under the clay and over the clay if you don’t have a rolling pin that’s dedicated to clay work.
- A rolling pin – Needed to roll out the clay. Again, just make sure to use the parchment paper over the clay as you roll. Or sacrifice this rolling pin to clay work only.
- Toothpicks – These are for poking out air bubbles if you want them.
- Stamps, lace or any other texture making items – For my DIY trinket dishes I used a heart stamp. I don’t mind that you can see the outline of the square a little. Handmade items have character and that’s just part of the character to me. In my greenware pottery work I’ve also used lace and found, natural items to create texture.
- A bowl – This will help to form the ring dishes. If using oven bake clay you need this to be oven safe. Also, like the rolling pin, these dishes should be dedicated for only clay work.If using air dry clay you can probably wrap it in cling wrap, but keep in mind the cling wrap might leave a pattern on the clay.
- Sand paper – I used a 200 grit sandpaper to just help smooth out the edges.
- Paint – Use whatever colors you prefer.
- Sealer – I used this one {HERE}. For a glossy finish, this one {HERE} is good.
- Optional – You might want something to help you make sure that the thickness of the clay is even. You can really use anything for this from rulers to pieces of trim or whatever you can find in the desired thickness.


Steps for making the DIY Trinket Dish
- Make sure your workspace is clean. The clay will easy show lint and other things like animal hair so wipe down the work surface before beginning. I’ve found working on a counter top is best.
- For the oven bake clay, cut off about 1/4 of the clay in the 2 lb. block. Work it in your hands for a few minutes to help soften it. Follow the same steps with air dry clay – using about 1/4 of the 2.5 lb. bucket. These amounts will get you 1-2 DIY ring dishes.
- Roll out the clay to the desired thickness. No matter which type you use, make sure to put parchment paper or wax paper below the clay and over the top of it too. I left my dishes about 1/4 inch thick.
- If using lace or a textured fabric, lay the lace onto the clay and use the rolling pin to press the pattern in. If using stamps, hold off.
- Use the cookie cutters to cut your shape. Then using individual stamps, stamp the clay how you like.
- Gently remove the clay from the parchment paper and lay it in the bowl. If it’s air dry clay, leave it for at least 24 hours. If it is oven back, follow the instructions on the package for baking. Do not over bake.
- When done hardening, use the sandpaper with a little water to help smooth out the edges. Also sand wet because clay particles are really bad for your lungs. (Make sure to clean up with a sponge too. Don’t wipe with a dry paper towel.)
- Let dry again and then paint as desired. Then let dry again.
- Seal the DIY trinket dish and then let it dry for a final time.
Looking for more easy craft and DIY ideas?
Check out these ideas too if you’re in a crafty mood!
- DIY Seed Paper {HERE}
- DIY Clay Garden Markers {HERE}
- How to make a puzzle board {HERE}
- DIY Body Scrub {HERE}
- DIY Foot Scrub {HERE}
Thank you so much for visiting today, friends! I hope that you enjoy this easy DIY ring dish and that you come back again!


This is so pretty! I need to make one of these for sure. I need a nice spot to put my jewelry.
These are so cute! I never thought to try my hand at creating my own I just might give this a try! Seem like it would be fun and easy to make
Oh my! This is so cute and a really nice idea! I love this! Can’t wait to try this out
These are cute, and a great idea. I love the ring set; I would have to check out more.
That’s a cute trinket dish, would also make for a nice key/wallet dish as well!
This is adorable! I love all of your photography too 🙂
This tricket dish looks amazing like made by a professional! And it sounds easy to make!
My daughter and I love to do crafts with clay, we’ve made some trinkets both air-dried and oven-baked, earrings are our favorites, and they’re fun to paint too!