This Cottagecore Christmas Wreath is the sweetest garden inspired holiday wreath! Find all the information and supplied for making it in the post below. Save this now to Pinterest so you can make it!
I’m loving the adorable, Cottagecore crafts and little touches this season. They’re perfect for anyone who love to garden and create, or just perfect for anyone who loves the Cottagecore or Gardencore aesthetic. I’ve made a few adorable mushroom inspired crafts this season and I wanted to try to create a Cottagecore Christmas Wreath inspired by the coziness of the season. I came up with this beautiful moss covered, grapevine wreath with some clay mushrooms and matte Christmas ornaments. It seems like the perfect mix of colors and textures to celebrate the season for any nature lover. Plus, the little mushroom plant stakes are just so dang cute.

A few things to love
Besides the fact that this wreath is beautiful and adorable all at once, there’s a few things I really loved about this project.
The mushrooms garden stakes were easy enough for my daughter to make. She is 11. So if you have a tween that you want to involve in an afternoon of crafting, these mushroom plant stakes are fun.
The whole Cottagecore Christmas Wreath can be made quickly. The wreath itself took me 30 minutes. The mushroom plant stakes take longer but that is simply due to the painting.
It really is open to interpretation. So any colors you want or any kinds of mushrooms you want will look wonderful.


Where to put it
I have my wreath in my greenhouse right now, but I might move it into my office or even my living room when I am done painting in there. I would not put this outside in the elements. The moss will get all soggy and I think you will be sad to see all your beautiful work become wet and limp. I would put this inside somewhere unless you have a covered porch where it won’t get wet or live in an atmosphere without a lot of moisture. Also, I did not glue my mushroom stake pieces on. However, if you are going to put this on a door, glue them on. They will fall off if the wreath is in a place where it is swinging from being opened and closed.
Clay for the plant stakes
I prefer using oven baked clay whenever I’m making projects for the blog out of clay. It often has fewer air bubbles in it and it becomes easier to work with for my hands. I have a small pottery studio set up in the barn so this is as close as you can get to a pottery clay without needing a kiln. The exact kind I used is listed int he products below. You can get about 8 mushrooms out of 1 pound of clay.


Supplies you need
This isn’t a complicated project but there there are quite a few things you need for it. Here is what I used:
- Grapevine wreath – Any kind you like will do.
- Preserved moss – I will give you more details on this below.
- Battery Operated Fairy lights – The amount you need will vary depending on how long the strand is and how big your wreath is.
- Small matte red and green ornaments – I found these in variety sets at the craft store.
- Vintage looking bells {HERE}
- One or two branches of faux berries, cut into pieces
- Oven baked clay – I use this clay {HERE} a 1 lb. block.
- Paint – In whatever colors you want. I listed mine below.
- Cheap paint brushes – These tend to get hard really fast so I use cheap wood ones and then toss them.
- Painting dishes – I have these reusable plastic dishes {HERE}. I like that they are reusable. Once the paint dries I can pick it out of the dish.
- Throw away fork – this is for making the mushroom gills.
- Toothpick or a bamboo skewer
- A glue gun
- Thick floral wire
- Thin floral wire
- Baking sheet
- Parchment paper
- Tin foil
- Modge podge/ Modge podge brush – I like a modge podge brush specifically because the bristles are stiff.
You can find most of the products {HERE} at my Amazon storefront. I’ve added in a few mini ball ornaments that might work for you too, just in case you can’t find any you like at the craft store.

The moss I used
The moss might seem like it is in the background, but it is really the base of this whole project. The cost of preserved moss can add up fast si I did two things here that helped me save money.
I suggest using two large bags with one color to form the base like I did. I used this brand as the base {HERE}.
Then I used other varieties in smaller bags that were more expensive to fill in gaps and add interest. This included this Reindeer Moss {HERE} and this moss mix {HERE}.
Paint colors I used for the mushroom plant stakes
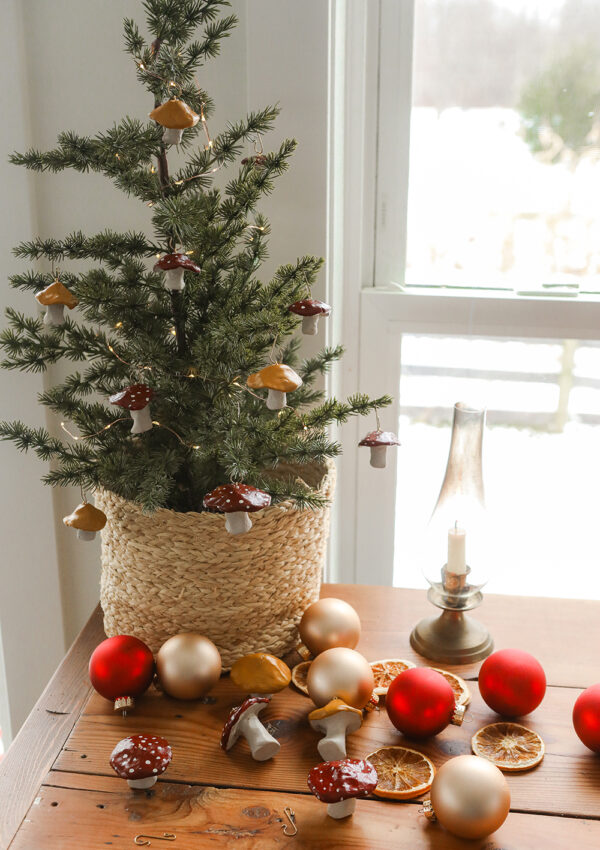
When it comes to painting the mushroom plant stakes, I used a variety of colors that I had laying around from other projects. I almost always combine colors in my paint trays to get something more custom but here is what I used. I used these same colors on my DIY Mushroom Ornaments {HERE} and I’m pretty happy with the results. Even though they were custom mixes based on my eye, I was able to get everything pretty close.
- The stems – On the stems I used a textured paint by Terra Cotta called Cool Concrete with a touch of Terra Cotta Terrazzo Tan paint mixed in. Just a touch though. I found if I added too much they became too fleshy colored. I love how this texture added a little more life to the stems.
- Yellow caps – I ended up using two different colors but at two different times. Because I was originally making plant stakes with these I used Deco Art Americana in Honey Brown. On the ones you see pictured are Deco Art Americana Deep Ochre.
- Red caps – For these I used Deco Art Americana Tuscan red with just a touch of Deco Art Americana Bittersweet Chocolate mixed in. A little goes a long way so it was literally a dot. This was a gloss paint unlike the others I used and this is the reason why I ended up midge podging all my caps, which I’ll go into later.
- For the white dots I used the Terra Cotta Cool Concrete.
- For the grey mushroom caps, I used Terra Cotta Paint in Fresh Granite.

Steps for making the mushroom plant stakes
- Use a 3 or 4-inch piece of oven bake clay and shape into a mushroom. Define the base stem and the cap. You can get a better idea of how I did this in the video above.
- To give the mushroom a nice, flat bottom, push the stem down on your work surface when you are done shaping it.
- Using the bamboo skewer, make a hole in the bottom of them stem. Go about 1/2 – 1 inch up.
- For the mushrooms growing out of the side of the wreath, use about 1-inch of clay and shape into a cap. Flatten it on one side and then make a hole with the bamboo skewer on the flat side. Go about 3/4 of the way through that mushroom. Be careful not to poke all the way through.
- Place the mushroom on a baking sheet with parchment paper. Wrap foil around it lightly to keep it from falling over while it bakes and then bake per package directions.
- Once cooled, paint as desired.
- Once dry, seal as desired with modge podge. I just sealed the caps of mine because my red paint was glossy while my yellow ones were matte and I wanted them to look the same.
- When dry, use the thick floral wire and cut it about 4 inches long. Glue one end of it into the hole at the base of the mushroom. Let dry and then use!
Steps for making the wreath
- Using hot glue, glue a base of moss that is one color to the wreath form. Go all the way around and fill in any spaces or holes you see.
- Use additional pieces of moss and glue them onto to add interest throughout the wreath form.
- Use thin floral wire to attach the small ball ornaments. You can group these as I did or add them one by one.
- Wrap with fairy lights or smaller battery operated lights.
- Add on bells or a bow to the top.
- Place in berry stems if you are using them.
- Place in the mushroom plant stakes. I did not glue mine but you can glue your’s if you like.
My favorite part
Do you want to know my favorite thing about this DIY Cottagecore Christmas Wreath? I fully intend to remove the Christmas ornaments after the season and use this wreath year-round. 🙂 It can hang in the greenhouse all year or even in my office and fit in perfectly.
Looking for more holiday DIY projects?
If you love to get crafty, here are a few other holiday projects that are perfect for the season.
- How to make dried oranges {HERE}
- Coffee Stained Nutcrackers {HERE}
- Faux Rusty Vintage Ornaments {HERE}
- Paper Bag Stars {HERE}
- DIY Mushroom Ornaments {HERE}
Visit on our Social Channels!
- Instagram @sugarmaplefarmhouse
- Pinterest Pinterest Sugar Maple Farmhouse
- YouTube Sugar Maple Farmhouse
- Facebook Sugar Maple Farmhouse
- Tik Tok Sugar Maple Farmhouse
Thank you so much for coming today! I hope that you love this Cottagecore Christmas Wreath and that it inspires you to make your own. Please let me know if you have any questions! Happy Crafting!


Leave a Reply