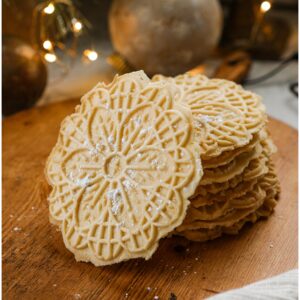
This is the best Pizzelle recipe for this lightly sweetened Italian cookie that you will find! It’s delicious, easy to make and just simple goodness Save it so you can make it year after year!

Last year I started working on my Pizzelle recipe and it was not working out. I talked to my Italian grandmother about it and she proceeded to tell me that everything I was doing was wrong – like Italian nonnas tend to do. So I went back to the drawing board and started again. This year, I nailed a recipe for Pizzelles that any Italian Nonna would be proud of! In fact, I sent my grandma a photo as they were cooling and she said, “Those look better than mine!” (Thanks, grandma. XOXO)

What are Pizzelle cookies?
Pizzelle cookies are traditional Italian cookies made from flour, eggs, butter, sugar and a flavoring – usually vanilla or anise and sometime almond and lemon. Pizzelle cookies can be soft and chewy or harder with a crisp to them. It depends on the preparation and how long they kind of cure between being made and being eaten. They often look like waffles to Americans and are in fact made with a special Pizzelle iron. They can also be molded and shaped. Pizzelles are from the Southern regions in Italy and known to be one of the oldest cookies – being developed in ancient Rome. They are often served at Christmas, Easter and Italian weddings.
“Pizze” comes from the word “round” and “flat” and “elle” means “small” in Italian. That’s a pretty good descriptor of these cookies. But I kind of wish the word beautiful were also included too because every time someone sees these, that’s the first word out of their mouth.

What do I need to make a Pizzelle recipe
To make my Pizzelle recipe you need the ingredients mentioned above – flour, sugar, butter, eggs and vanilla. I always turn towards vanilla for these because I truly dislike anise. I’m also not a big fan of almond. I’m a vanilla girl all the way.
You also need a Pizzelle iron. I have this Pizzelle maker {HERE}. It’s not expensive and it works well!
Other than that, you just need about 20 minutes because this Pizzelle recipe is fast to whip together.

Tips for making my Pizzelle recipe
- Make sure you use a spay oil or spray butter on the iron. In my struggles I found that this is imperative to use in between each cookie otherwise they stick to the Pizzelle iron.
- Take your eggs out about an hour ahead of time. Crack them and cover them. I’m a firm believe in not using cold eggs in baked goods. It is generally easy for me because we have chickens and leave them on the counter. But in the winter I have to buy them because I let my girls rest.
- Make sure to watch your butter after you melt it. It needs to be cooled but you don’t want it to firm up again. Don’t put the pizzelles away too quickly. Pizzelles will firm as they cool and you want them to be completely cooled before you stack them or put them into any kind of storage. Otherwise they will kind of steam together. I’ve found it’s actually best to leave them out overnight (or about 12 hours) for firmness. Of course, you can eat them while they’re soft too! Just don’t stack them.
- Once the Pizzelles are cooled you can keep them in an airtight container. My grandma swears by the tin containers that are usually easy to find around Christmas. They will keep for about a week and a half. You can also freeze them in a ziploc bag and then thaw them on the counter. Although, don’t frozen pizzelles with ice cream sound perfect?
- I use an ice cream scoop to put the dough on the iron. I use about half a scoop.
- If the dough spreads beyond the mold (as it likes to do), you can trim the pizzelle cookies while they’re soft and cooling with a knife.

Need more cookies? Try these!
These are some of my favorite holiday cookies!
Cranberry Shortbread Cookies {HERE}
No Chill Cut Sugar Cookies {HERE} (Perfect for holidays and year-round too!
Lemon Shortbread Cookies {HERE}
Thank you for visiting today, friends! I hope that you love my Pizzelle recipe and that you’ll come back again! You can find the full, printable recipe below!

Italian Pizzelle Recipe
Equipment
- Pizzelle Iron
Ingredients
- 1 3/4 cups all-purpose flour.
- 3/4 cup sugar
- 1/2 cup butter, melted and cooled
- 3 eggs
- 2 tsp. baking powder
- 1 Tbsp natural vanilla extract
- Olive oil spray or butter spray
- Powdered sugar as desired.
Instructions
- Sift or whisk together flour and baking powder and then set aside.
- In another bowl, beat eggs and sugar together for about 3 minutes until they're fluffy.
- While beating, slowly drizzle in the cool, melted butter. Then add in the vanilla extract.
- Add in the flour mix little by little and beat until well combined.
- Heat the pizzelle maker and then spray it with olive oil or butter. Add about 3 tablespoons of the dough (about half an ice cream scoop) just behind the center of the pizzelle maker. It will spread as the iron comes down.
- Cook for 30 seconds.
- Use a metal spatula to remove the cookies and place directly on a cooling rack
- Let them cool completely and then dust with powdered sugar.


Ooo I love these. I usually buy them in stores but I should see if I can make them. Not only are they good, but they are pretty as well!
They’re so easy to make!
I want to make chocolate Pizzelle, how do I do this with this recipe
Ii would add 3 tbsp of cocoa powder to the batter.
Your proportions are off – you are short on flour and way over on vanilla. And these are traditionally anise flavored. They do not need to “firm up.” And they stay fresh for a long time. You should go back to the drawing board on this one.
You are so wrong. This recipe is perfect.
Hi Shelly, I’m sorry you didn’t like this one. If you read the blog you will see that I said I don’t like anise flavoring. So while I realize they are flavored that way traditionally, I prefer vanilla. Additionally, I find a lot of recipes fall short when using vanilla flavoring. It’s not as strong as something like anise. You may of course flavor them in any way you like. A lot of people like adding lemon flavor as well.
I also never said they “need” to firm up. I said they “firm as they cool” and they they should be completely cooled before you store them so they don’t steam together. Mine don’t get crisp if that’s what you’re thinking I’m saying. They’re always a rather soft cookie. As for freshness, I don’t recommend anyone keeping baked goods at room temperature for more than a week without freezing. To me, freshness is the point when baking something on my own. Of course, you can again do whatever you like. It sounds like you’re perfectly happy with your own recipe and that’s wonderful.
Perfect recipe…make them all the time and they do need to firm up. If you want softer make them thicker. This is perfect as it is.